
(ARDUINO) Distance Senor with StopLight Indicator
Summary
One Arduino can do lots of cool stuff but connect them over the internet and you can do tons of cool stuff. In this report I’ll be showing you how to use an ultrasonic distance sensor to measure distance and use that distance to trigger a stop light light indicator.
Application
A distance sensor with indicator can have many application. One application is indicating when you should stop your car when pulling into a garage. In the COVID-19 pandemic you could use this distance sensor and indicator to show whether people are properly social distancing. The possibilities are endless.
How does it work?
The Arduino is connected to a HC-SR04 ultrasonic sensor that uses technology very similar to echolocation to measure the distance between itself and objects. The distance measured by the sensor is sent to the Arduino which is programmed to send a http request based on the distance measured over the WiFi connection to the the traffic light indicator. The traffic light then indicates to the person whether they should continue moving forward, slow down, stop or back up. This relationship is represented in the diagram below.
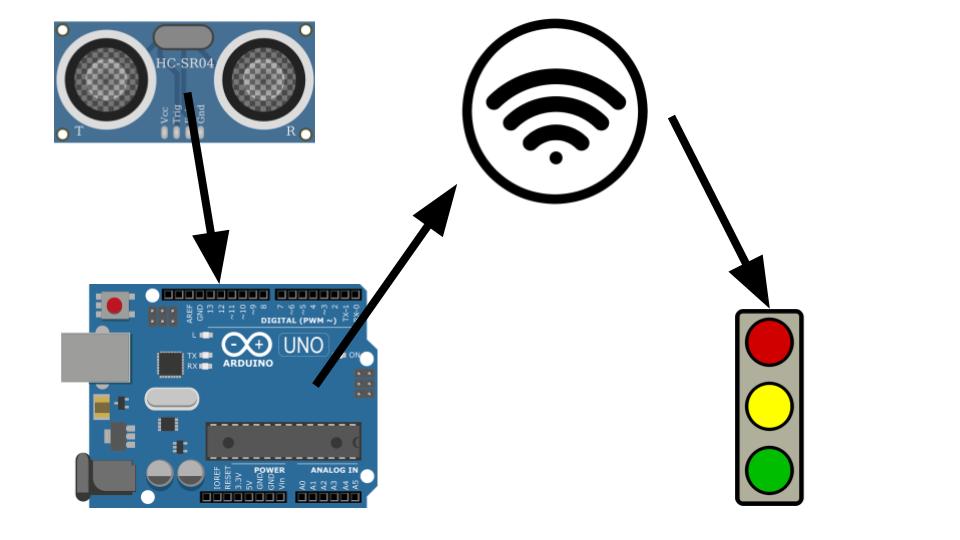
To understand how the traffic light indicator works go check out my last post here.
Materials Needed
- Arduino Wemos D1 mini
- HC-SR04 Distance Sensor
- Breadboard
- 4 wires
- Stop Light Indicator (Click here for setup)
- Computer with Arduino IDE
Hardware Setup
- Let’s get the Distance Sensor setup with the Arduino
- The end result will look like this:

- Grab all the materials necessary except the traffic light indicator and your computer
- Pick a place on the bread board and insert the Ultrasonic Senor so that the four pins are each on different rows.
- Now connect a wire from the row with the VCC pin and connect it to the 5V pin on the Arduino
- Pick two pins on the Arduino to be your Echo and Trigger pins and connect wires to the breadboard accordingly.
- Finally connect a wire from the GND pin to the G pin on the Arduino
- The final result should now look like similar to the diagram above.
Code Setup
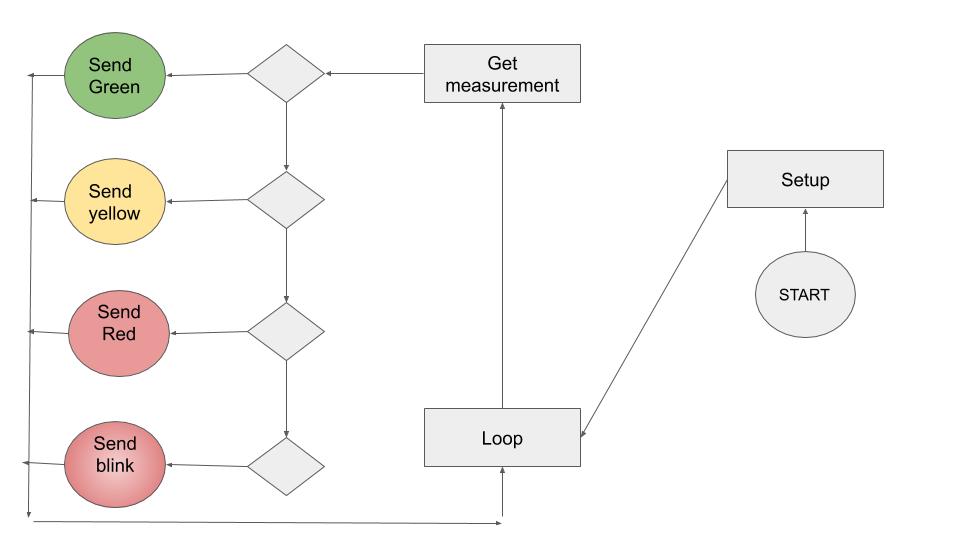
The code is going to be looping through the readings sent from the ultrasonic sensor and storing it as a variable. From there we will manipulate the variable to be in the desired form of measurement and we will use that measurement check if the object in front of the sensor is in one of the zones predetermined zones. Depending on which zone the object falls under will determine which HTTP request is sent to the Traffic Light Indicator.
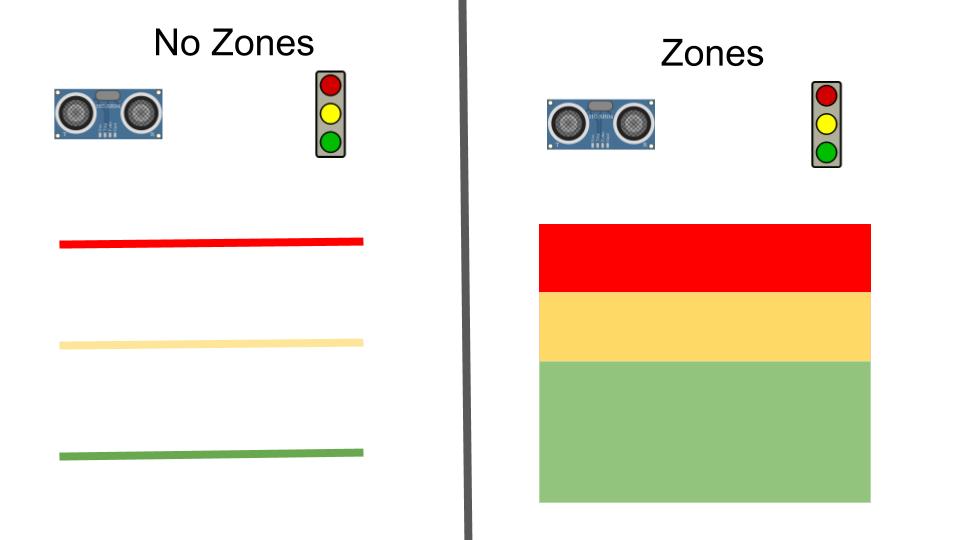
Why zones? Precise measurements are very hard to get to and in the case of parking a car or properly social distancing you don’t need to be extremely precise. By using zones we ensure that the object is within an expectable range of distance rather than being at the exact distance. The overall effect is the same.
Setting up Arduino IDE
- Grab your computer
- (This setup tutorial comes from jonathanblack.org)
- Download and install Arduino IDE from https://www.arduino.cc/en/Main/Software
- Accept installation of USB drivers for Arduino.
- Add the Wemos D1 library to the Ardinuo IDE
- In the Arduino IDE select File -> Preferences
- In the Additional Boards Manager URLs field enter: http://arduino.esp8266.com/stable/package_esp8266com_index.json
- Click Tools -> Board: …. -> Board Manager
- Search for “Wemos D1” and install the “esp8266” board module
- Select the Lolin(Wemos) D1 R2 & mini . Click Tools -> Board … -> Lolin(Wemos) D1 R2 & mini
- Plug Wemos D1 Mini into computer with USB cable.
- Open Device Manager. Look for a CH340 device under Ports. Note which COM port the device is assigned to
- In the Arduino IDE, select the proper COM port by clicking Tools -> Port
- Write Code. Upload it to the board by click Sketch -> Upload
- I recommend including the #include <ESP8266HTTPClient.h> for making the HTTP requests.
Code
To see the code I wrote check out my GitHub.
Certificate of Work
The work here represents my own and where I used others work I gave the credit it deserved.
References
- https://techtutorialsx.com/2016/07/17/esp8266-http-get-requests/
- In class examples
- https://www.tutorialspoint.com/arduino/arduino_ultrasonic_sensor.htm#:~:text=Advertisements,or%201%E2%80%9D%20to%2013%20feet.
- google.com
Thought Questions
- Think of the interaction between your devices. How well would this scale to multiple devices? Is it easy to add another sensor? Another actuator?
- Depends. Adding another sensor and actuator would work fine the issue becomes synchronization. Using the HTTP request method feel slow and would take time for each device added meaning that the synchronization would be delayed per device added.
- What are strengths and weaknesses of the tennis-ball-on-a-string system that Don had originally?
- It’s strengths are that it consumes no power nor requires a WiFi connection. The weaknesses of the system are precision and being properly notified when when to stop the car.
- What are strengths and weaknesses of the IoT system that he developed? What enhancements would you suggest?
- Strengths would be precision and a clear indicator of how to get to the right distance. Weakness are the required power and WiFi connection. Both are not always available.
- What was the biggest challenge you overcame in this lab?
- My biggest challenge with this lab was the HTTP requests. Initially I tried to send the requests via a curl command but that proved to be unprofitable. I then discovered the HTTPClient method and was able to get the requests working almost instantly.
- Please estimate the total time you spent on this lab and report.
- Lab: 2-3 hours
- Report: 2 hours