Summary
Ubiquitous Computing is the idea that computers and electronics are being seamlessly integrated into everyday life. This tutorial will show you how to do that with a garage setup. First we’ll be implementing a door sensor to alert the system of whether or not the garage door is open and then we’ll look into MQTT as a way to connect several IOT devices asynchronously across a network.
Application
A door sensor can be useful in several ways but the more important application is the MQTT broker. Being able to keep IOT devices in sync around a network can be extremely helpful. Imagine for a second you have a IOT security system. The moment the alarm is trigger an MQTT broker can send every device on the network into the lockdown protocol at the same time. Or using this method an array of lights around the house could instantly be turned off. The applications of multiple devices in sync is endless.
How does the Door Sensor work?
When the the two parts of the sensor are together the sensor reads as closed but once the sensors separate the sensor reads as open and sends the necessary message to the network.
How does MQTT work?
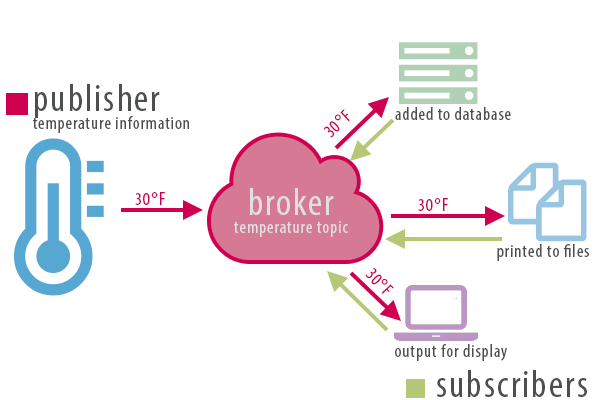
The easiest way to explain MQTT is to think of it like YouTube. On YouTube you can subscribe to a channel and can hit a small bell to be notified when ever the channel publishes a video. Conversely, if you don’t hit the small bell icon you won’t be notified. And finally based on the video and it’s content you decide whether or not to watch the video. MQTT is very similar. IOT devices are connected to a MQTT server and subscribe to certain topics and are notified when one of those topics is published. Based on the message that comes with the topic the IOT device can execute a function. Here’s a graphic showing how that would work on a thermometer system:

In the case of our IOT garage setup the door sensor publishes to the garage topic and the distance sensor turns on only if that published topic has the message “open”.
Materials Needed
- RaspberryPi
- Arduino D1 Mini
- DC 1561 Surface Mount Alarm
- Computer
Hardware Setup
- Let’s get the Surface Mount Alarm Setup
- The end result should look something like this:

- grab the Arduino D1 Mini and the surface alarm
- connect one of the surface alarm wires to a pin on the d1 and the other to the Arduino GND pin.
- Plug into the computer and get ready to code.
Code Setup
Before explaining the door sensor code there is some code that should be added to ultrasonic sensor. The code added enables the sensor to only turn on when an MQTT message says that the garage door is open. For the rest of my ultrasonic setup check out the tutorial here. In the end the MQTT interaction will look like this:

Now for the door setup. The idea is very simple when the device turns on it will connect to the MQTT server. Then it will publish a message to the garage topic on the status of the door. If the sensor shows as closed then publish closed, if open publish open.
Code
To see how I coded this check out my github
Certificate of Work
The work here represents my own and where I used others work I gave the credit it deserved.
References
- https://aaronnelson95.com/IT441Lab4.php
- https://www.google.com/search?q=dc+1561+arduino+setup&safe=active&rlz=1C1CHBF_enUS848US848&source=lnms&tbm=isch&sa=X&ved=2ahUKEwj0lYiF2tXsAhXcCTQIHU_NC70Q_AUoAnoECAkQBA&biw=956&bih=954
